Regular maintenance and small water changes are unavoidable if you want to keep happy and healthy fish. It doesn’t matter how good your filter is, you have to do it.
Allowing your tank to get dirty will cause a buildup of harmful waste byproducts and create the perfect environment for disease to thrive. And dealing with diseased fish is a lot harder than cleaning your aquarium every week or so.
It’s much easier than you think to do a water change, and you can use this simple step-by-step guide to make it even easier.
When I say clean your fish tank, what I’m actually saying is maintaining your tank through water changes.
And these water changes help restore and maintain a balanced aquarium by physically removing and diluting harmful chemicals while replenishing vital elements.
Step-by-Step Guide: How to Perform a Water Change & Clean Your Aquarium
Let’s get into it, shall we?
Step 1: Get Your Equipment Ready
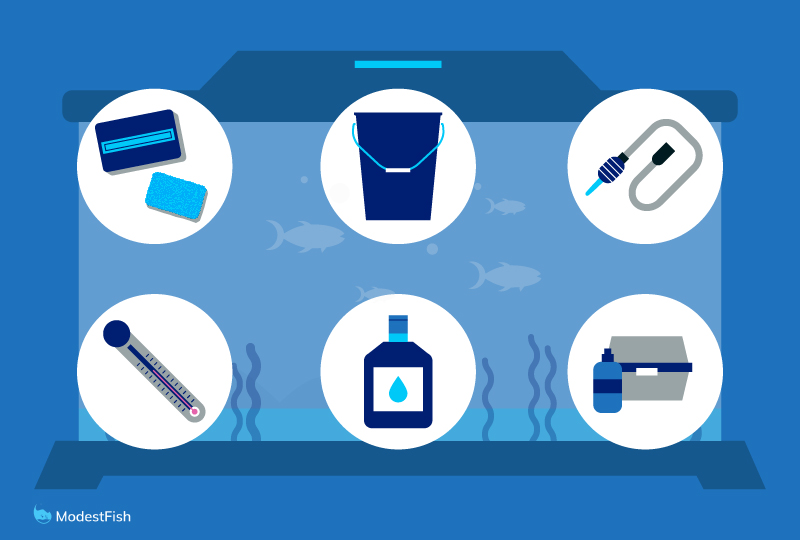
Start by making sure you’re fully prepared and have all necessary equipment:
- Algae scraper or magnet cleaner
- A dedicated bucket (5 gallons is common but size is not vital)
- Gravel vacuum
- Thermometer
- Water conditioner
- Water testing kit
Make sure to NOT use your aquarium cleaning equipment for household cleaning. Residues from soaps and cleansers can be lethal to fish and invertebrates.
Step 2: Clean the Inside Tank Glass
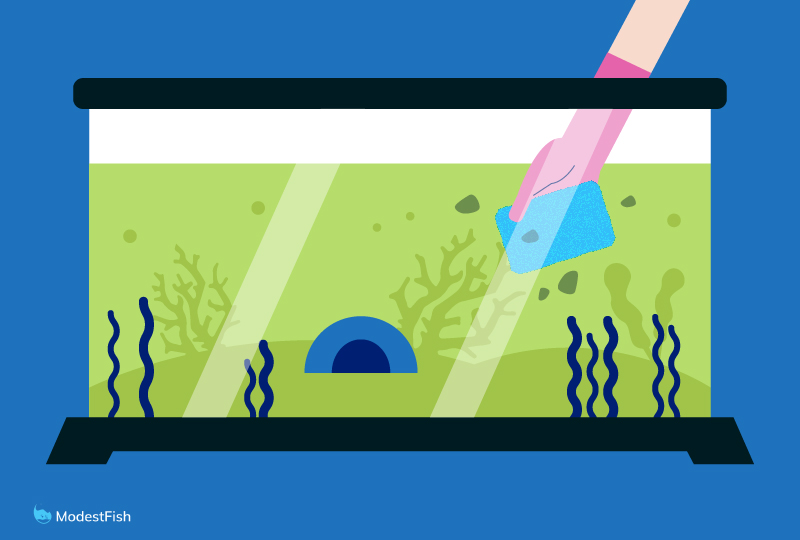
OK hear me out on this one, I’ll admit, it might sound a bit counterintuitive at first glance.
It’s way easier to see the algae when the tank is full of water and the light is still on. Get as much of the algae as you can while you’ve still got the lids and light on.
As soon as you have to turn the tank light off, it suddenly gets a whole lot harder to see what you’re doing.
Another reason to clean the inside glass first is the scraped off algae will float around in the water column. This will get sucked up with the gravel vacuum when you’re draining the tank, removing it from the tank entirely.
And you don’t HAVE to clean off every inch of the glass. There is no aquarium police that will inspect your tank for any missed algae.
If you can’t see it from the front of the tank, and it’s not bothering you, just leave it.
There’s no reason to half kill your back trying to get to a small patch in the back corner of the tank if no one can see it anyway.
Step 3: Unplug Equipment
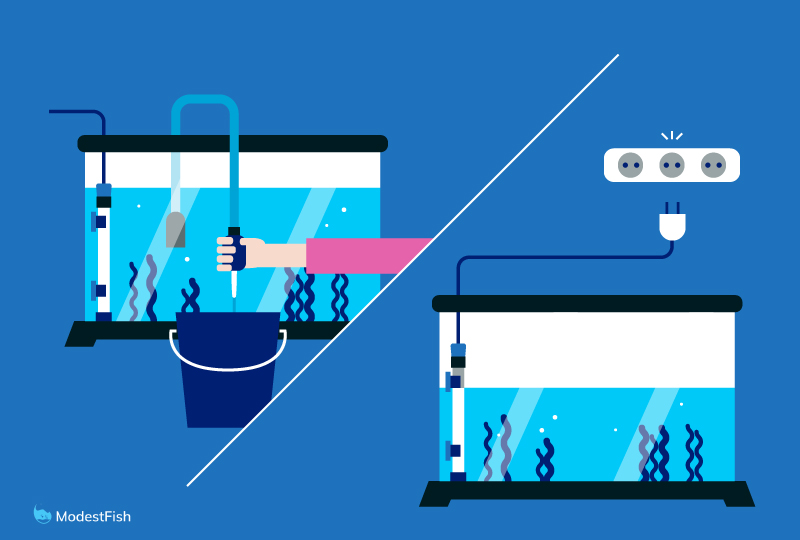
At this point, go ahead and remove your lid and lights. Trust me on this, get these items well out of the way while you work. I’ve had two tank lids and a really nice set of lights get destroyed when people stepped on them.
Especially make sure to unplug your heater. Aquarium heaters are not meant to run outside the water. They can overheat, crack, shatter and/or melt. They can even deliver a nasty burn if you accidentally touch them while they’re hot.
It’s best to unplug the heater 15 minutes before you drain the tank to make sure that it can cool down before it’s taken out of the water.
Also, make sure to unplug your filter. The motors in hang-on-the-back and canister filters can burn up if they’re allowed to run dry.
You don’t have to unplug any air pumps you’re using, but I usually end up doing this anyway because everything is usually plugged into the same strip plug. No harm or foul either way.
Step 4: Clean the Aquarium Decorations
If everything in your tank looks good, you can just skip this step.
You don’t have to clean your aquarium decor every time you do a water change, only when it builds up algae and looks bad.
My chosen aquarium cleaner is a 50/50 mix of water and vinegar. It’s completely non-toxic and won’t stain clothes.
But, if it’s really tough algae, I will use bleach:
- Never ever use bleach in the aquarium. I suggest taking out the rocks or decor and placing them in buckets in the bathtub.
- Mix 1 part bleach to 20 parts water. That’s 6 fluid ounces per gallon.
- Soak the decor for 10-15 minutes in the bleach solution.
- Rinse the decor with plain water until you can no longer smell bleach.
- Submerge the decor in water again and add a 5 times normal dose of dechlorinator. Let the decor soak for 10 minutes or so.
- Dump the soak water and the decor is now safe to put back in the aquarium.
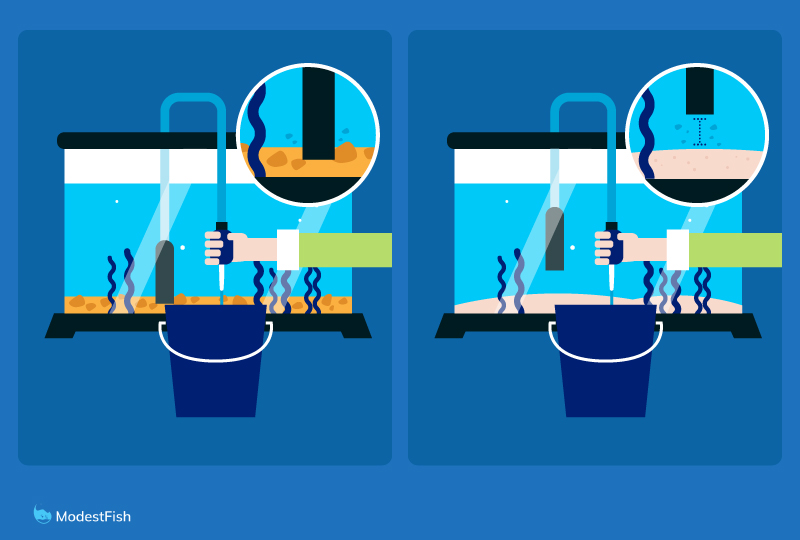
Step 5: Siphon the Water and Clean the Substrate
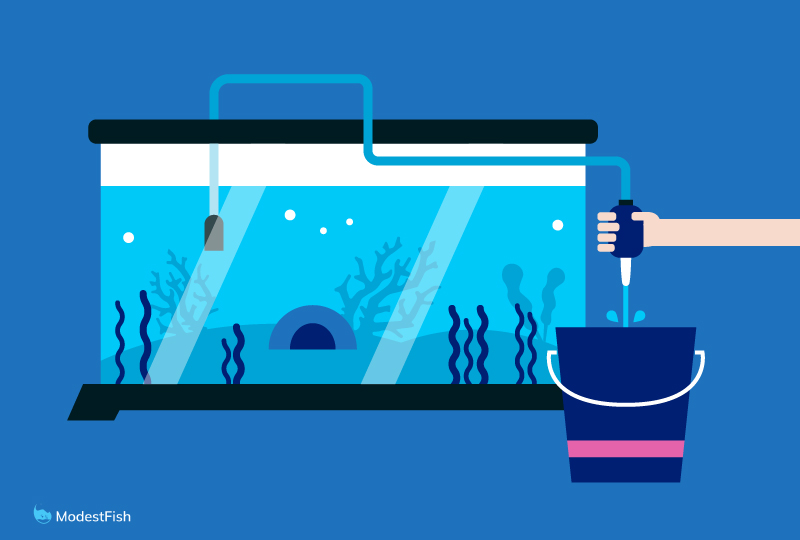
Start by siphoning your tank’s water into your bucket.
How you clean the substrate depends on what kind of substrate you have:
- Gravel – This is the easiest kind of substrate to clean. You can push the tube of the gravel vacuum down until it hits the bottom glass, wait for the plume of fish poop/uneaten food to rise, pull the lift tube up and go to the next little area. Repeat this until you vacuum as much of the area at the bottom of the tank as possible.
- Sand – Sand is a bit trickier because it’s so much lighter than gravel. The gravel vac will just suck the sand right out of the tank and into the bucket if you’re not careful. I like to use a vac with a very long lift tube and hose. I have a 12 foot (4 meter) hose that I run out into my garden. (A Python style gravel vac works similarly if you don’t have garden access, but you’ll need to be extra careful to not let sand through.) The long hose slows the flow down and the long lift tube gives you more room to keep sand from being sucked through. You can stick the hose down into the sand and suck up trapped wastes, but you’ll need to kink the hose periodically to stop the suction when the sand rises up the tube too much.
- Baked Clay Substrate – You can clean baked clay the same way you do gravel. Just be careful in planted areas so you don’t disturb plant roots.
- Aquarium Soil – You’ll need very gentle suction for a soil substrate. It is very light and easily gets sucked into your bucket. It’s best to start the siphon above the substrate and then kink the hose to slow and control the flow. Siphon just above the substrate and lightly on the surface of it. It’s best to be slow and careful.
I generally siphon out at least 50% (sometimes as much as 75% for fry tanks) each week.
This keeps the substrate nice and clean while also keeping nitrates low.
Step 6: Rinse Your Filter Media
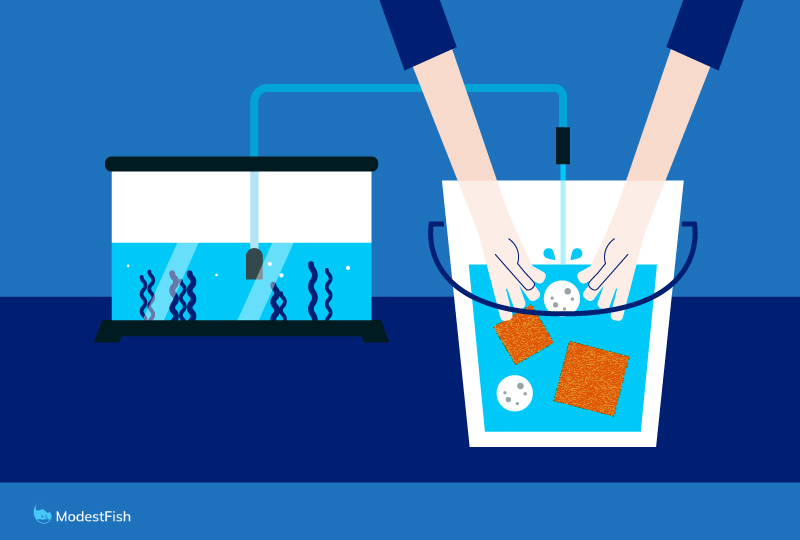
Chlorine in the tap water will kill the beneficial bacteria living in your filter and damage the Nitrogen Cycle going on in your aquarium.
So, it’s really important to only rinse your filter media in dechlorinated water, either old tank water, or tap water treated with dechlorinator.
Mechanical media, like sponges or aqua mesh, can be squeezed and rinsed out in buckets. Super fine mechanical media, like polishing pads or filter floss can be discarded if they are still clogged after rinsing.
Biomedia, like bio balls or ceramic noodles, really only needs a light rinsing. I usually just swish it around to get off any built up algae.
You don’t want to clean your biomedia too much, that’s where the majority of beneficial bacteria in your aquarium live. Deep cleaning would kill them.
Step 7: Add Your New Aquarium Water
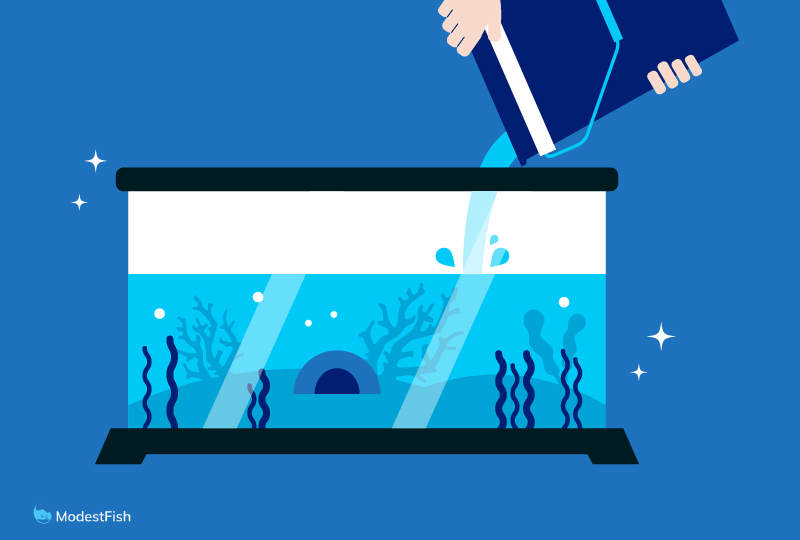
Unless you have well water, you absolutely have to use some sort of dechlorinator.
Personally, I only use Seachem Prime. It destroys chlorine and detoxifies ammonia. It’s also much more concentrated than other dechlorinators, making it much cheaper to use over time, especially if you’re like me and have 8 million tanks.

Last update on 2026-07-13 / Commissions Earned / Images from Amazon Product Advertising API
You’ll need a thermometer so you can get your water as close to your aquarium’s temp as possible.
If you’re using buckets, treat each one with dechlorinator.
If you’re using a filling system, like a Python or Hygger, you can add the full dose of dechlorinator directly to the aquarium. The chemical reaction that destroys the chlorine happens instantly.
Some might hesitate to do this, but I assure you, I’ve used this method hundreds of times on my own tanks with no ill effects on the fish or shrimp that I keep.
Step 8: Cleaning the Outside of Your Aquarium
Not essential, but it can make viewing your tank a lot more pleasurable.
I recommend mixing up a 50/50 water/vinegar solution in a clean spray bottle.
It’s great for cleaning aquarium glass and it’s great to get calcium buildup off of tank lids.
I also highly recommend using a squeegee. It saves so much time and gives you a streak-free shine that’s hard to beat.
1. You’ll Reduce Harmful Compounds
Ammonia, nitrite, and nitrate can all be harmful to your fish.
During your initial Nitrogen Cycle, ammonia will turn to nitrite and nitrite will turn to nitrate. But, most aquarium ecosystems lack the ideal conditions to efficiently process nitrate.
At low levels, nitrate isn’t harmful to your fish. But, if too much of it builds up, it can start to stress your fish, making them vulnerable to disease and promoting poor growth and color development.
By draining some water out, and replacing it with fresh water, you will be removing nitrates.
2. You’ll Remove Decomposing Waste Materials
Decaying organic wastes in your aquarium, like fish poop and urine, are what cause nitrates in the first place.
If too much waste builds up, it leads to poor water quality. In extreme cases, they can create an acidic environment, compromising the buffering capacity of your water and harmful pH swings can occur.
When you remove fish wastes with a gravel vacuum, you get rid of the source of the nitrate in the system.
3. You’ll Replenish Trace Elements and Essential Minerals
In the wild, there’s a consistent source of minerals, nutrients, and vitamins.
Even fish that thrive in soft water environments need some mineral content in their water in order to be healthy.
However, these vital elements can become depleted as your inhabitants use them to grow. Water changes will provide a fresh supply of necessary elements for proper growth.
Quick FAQs for How to Perform a Water Change
Do I have to take everything out of my fish tank?
No, you don’t want to do this.
It creates extra work and a large mess you don’t have to deal with.
You can usually just move decor around for routine water changes. You just want to try and access as much of the substrate as possible so you can vacuum out wastes.
Should I remove the Fish?
No, you don’t need to remove the fish when you perform your regular 25%-50% water changes.
You’re going to make more work for yourself than you need to, and it is going to be extremely stressful for your fish. It could even cause physical injuries.
Final Thoughts on Water Changes and Cleaning your Fish Tank
Regularly changing out water is one of the most important aspects of maintaining a healthy environment for your fish to thrive. And it’s not very difficult, just follow the simple steps provided.
It might seem daunting at first, but once you do it once or twice, you’ll soon get a system down and it will seem easy.

Thank you, that was the best I’ve read on cleaning my aquarium.
Thank you, set up my first aquarium, and this as given me the confidence to carry out my first watch change correctly and safely.
So I keep killing off my fish after a water change! The only thing I’m not doing is letting my water sit for a day and that’s because when I do the water temps are very drastic since my tank has a heater on it! Any advice?
I change my water once a week. I do not leave my water a day. I take a sample of my water out of my aquarium and then by touch make my new water close to that temperature. I of course add declorinate the water. I have no problems and have never lost a fish
Thank you very much for the useful tips.
Very nice and detailed step by step article. Thank you!
I have struggled with my new tank for almost two mths and have been following fish sites on fb and they had me going in a million directions..needless to say i have murdered a few fish along the way ?…this is the first explanation of beginning and maintaining a fish tank that actually makes since!! Thank you soooo much!
I wish I read this last week I would still have my fish , I enjoyed what I read and learned how to properly clean my tank , thanks you have been a great help.
I agree. My first aquarium and I had no clue what to do. This was extemely helpful. Thanks!
Thanks for the useful tips.
Getting back into aquariums after a very long time. Thanks for the info.
Great post! This will surely help every newbie out there.